Battery switch on travel trailer function is crucial for managing your RV’s power. This guide dives into the hows and whys of these switches, covering everything from understanding the different types and their uses to troubleshooting problems and ensuring safe operation. We’ll explore how to optimize power usage, maintain your system, and even tackle the nuances of different battery types and their compatibility with your switch.
Get ready to become a battery switch pro!
Understanding your travel trailer’s battery switch is key to enjoying hassle-free adventures. This involves knowing how to safely switch between your house battery and vehicle battery, preventing accidental power drains and ensuring you have power when you need it. Proper use and maintenance will extend the life of your batteries and keep your RV running smoothly. We’ll cover practical tips and safety precautions to make your RV electrical system a breeze to manage.
Understanding Battery Switch Functionality in Travel Trailers
Managing your travel trailer’s power effectively is crucial for a smooth and enjoyable camping experience. A battery switch is a key component in this process, allowing you to control the flow of power between your trailer’s house battery and your tow vehicle’s battery. Understanding how it works will prevent dead batteries and ensure you always have power when you need it.
Types of Battery Switches
Travel trailers typically utilize one of two main types of battery switches: a simple on/off switch, and a more complex multi-position switch (often a 1-2-Both switch). The on/off switch simply connects or disconnects the house battery from the trailer’s electrical system. The 1-2-Both switch offers more control, allowing you to select the vehicle battery, the house battery, or both simultaneously.
Some more advanced systems incorporate remote-controlled switches for added convenience.
Purpose of a Battery Switch
The primary purpose of a battery switch is to manage the power sources available to your travel trailer. This is essential for preventing the depletion of your vehicle’s battery while the trailer is not connected, and vice versa. By strategically using the switch, you can charge your house battery from the vehicle’s alternator while driving, or disconnect it to conserve power while parked.
Additionally, it acts as a safety mechanism, allowing you to completely disconnect the house battery when not in use to prevent accidental drain.
Using a Battery Switch: A Step-by-Step Guide
Properly using your battery switch is straightforward but critical. Here’s a step-by-step guide:
1. Identify your switch
Locate the battery switch, usually near your battery or electrical panel. Familiarize yourself with its markings (on/off, 1-2-Both, etc.).
2. Charging the house battery
While driving, switch to the “Both” position (if available) to charge the house battery from your vehicle’s alternator. This will ensure your house battery is ready for use when you reach your campsite.
3. At the campsite
Switch to the “House” position to use the power from your house battery to run your trailer’s appliances.
4. Disconnecting the house battery
Planning a trip? Don’t forget travel insurance! Seriously, it’s a lifesaver. Check out Aon travel insurance for comprehensive coverage. They offer various plans, so you can find one that fits your needs and budget. If you’re into adventure travel, Aon travel insurance might be a great option too, as they often have specific policies for adventurous activities.
Comparing options is key before you book your flights!
When leaving your campsite or for extended periods of storage, switch to the “Off” position to disconnect the house battery and prevent drain.
So, you’re planning a trip? Awesome! Don’t forget travel insurance! Check out aon travel insurance for comprehensive coverage. They’ve got options to suit various budgets and trip lengths. For another great option, consider looking at aon travel insurance – they often have competitive deals, especially if you book early. Getting insured is a small price to pay for peace of mind, right?
Remember to compare quotes before you decide!
5. Using the vehicle battery
If you need to power accessories from your vehicle battery while the trailer is connected, select the “Vehicle” or appropriate position to utilize that power source independently.
Comparison of Battery Switch Types
| Switch Type | Advantages | Disadvantages | Best Use Case |
|---|---|---|---|
| On/Off | Simple, inexpensive | Limited control, cannot charge house battery from vehicle | Basic power control, short trips |
| 1-2-Both | Versatile, allows charging of house battery, independent control of power sources | More complex, slightly more expensive | Extended trips, frequent use of house battery |
| Remote Switch | Convenience, easy access without needing to reach the battery | More expensive, requires additional wiring and installation | Users prioritizing convenience and ease of access |
| Disconnect Switch | Complete isolation of house battery, safety feature | Cannot charge the house battery unless it is reconnected | Long-term storage, preventing parasitic drain |
Troubleshooting Common Battery Switch Issues
Your travel trailer’s battery switch is a crucial component, controlling the flow of power between your trailer’s batteries and the various electrical systems. Problems with this switch can leave you stranded without lights, appliances, or even the ability to charge your batteries. Understanding common issues and how to troubleshoot them is essential for any RV owner.This section details common problems with battery switches, providing step-by-step troubleshooting guides and highlighting important safety precautions.
Remember, working with RV electrical systems requires caution. If you’re uncomfortable performing these checks, consult a qualified RV technician.
Common Battery Switch Problems and Their Causes
Several issues can arise with your battery switch. The most common include a complete lack of power, blown fuses, and the switch failing to properly connect or disconnect battery banks. A lack of power can stem from a faulty switch itself, a blown fuse in the switch’s circuit, corroded connections, or even a problem with the batteries themselves.
Blown fuses typically indicate an overload or short circuit somewhere in the system. A switch failing to connect or disconnect correctly points towards a mechanical problem within the switch mechanism, possibly due to wear and tear or damage.
Troubleshooting Steps for a Non-Functional Battery Switch
Before you begin, always disconnect the negative (-) terminal from your RV’s batteries to prevent accidental shocks. This is a critical safety precaution.
- Inspect the Fuses: Carefully check all fuses associated with the battery switch and the circuits it controls. Look for blown fuses (broken filaments). Replace any blown fuses with fuses of the same amperage rating. If a fuse blows immediately after replacement, this indicates a short circuit somewhere in the system that needs professional attention.
- Check the Battery Connections: Examine the connections to both your house batteries and your chassis battery (if applicable). Look for corrosion, loose connections, or damaged wires. Clean any corroded terminals with a wire brush and reconnect securely.
- Test the Switch Itself: If the fuses are intact and connections are good, the problem may lie within the switch itself. Use a multimeter to check for continuity across the switch’s terminals in the “on” position. Lack of continuity suggests a faulty switch requiring replacement.
- Verify Battery Voltage: Use a multimeter to check the voltage of your batteries. Low voltage might prevent the system from functioning even if the switch is working correctly. Low voltage could indicate the need for charging or battery replacement.
- Inspect Wiring: Carefully examine the wiring leading to and from the battery switch. Look for any signs of damage, such as frayed wires or exposed conductors. Repair or replace any damaged wiring.
Safety Precautions When Working with RV Batteries and Electrical Systems, Battery switch on travel trailer function
Working with RV batteries and electrical systems carries inherent risks. Always prioritize safety by following these precautions:
- Disconnect the Negative Terminal: Before working on any part of the electrical system, always disconnect the negative (-) terminal of your batteries. This prevents accidental shocks.
- Wear Protective Gear: Use safety glasses to protect your eyes from sparks or acid splashes. Gloves are also recommended to prevent skin irritation from battery acid.
- Proper Ventilation: RV batteries emit hydrogen gas, which is highly flammable. Ensure adequate ventilation to prevent the buildup of flammable gases.
- Avoid Sparks: Be cautious to avoid any sparks near the batteries, as they can ignite hydrogen gas.
- Consult a Professional: If you are uncomfortable working with electrical systems or batteries, consult a qualified RV technician.
Troubleshooting Flowchart for a Non-Functional Battery Switch
Imagine a flowchart. The starting point is “No Power”. The first decision point is “Are fuses blown?”. If yes, replace fuses. If no power persists, the next decision point is “Are battery connections secure and clean?”.
If no, clean and tighten connections. If the problem persists after this, the next decision point is “Does the switch show continuity?”. If no, replace the switch. If yes, check battery voltage. Low voltage indicates a battery problem.
If voltage is good, the problem may require a professional electrician.
Battery Switch Installation and Wiring
Installing a battery switch in your travel trailer is a crucial step in managing your power system. A correctly installed switch allows you to isolate your house batteries from the chassis battery, preventing unwanted drain and protecting your investment. This section details the process, different wiring configurations, and their implications.
Proper wiring is paramount for safety and efficient power distribution. A poorly wired system can lead to electrical fires, battery damage, or even complete system failure. Take your time, double-check your work, and if you’re unsure about any aspect, consult a qualified electrician.
Wiring Diagram
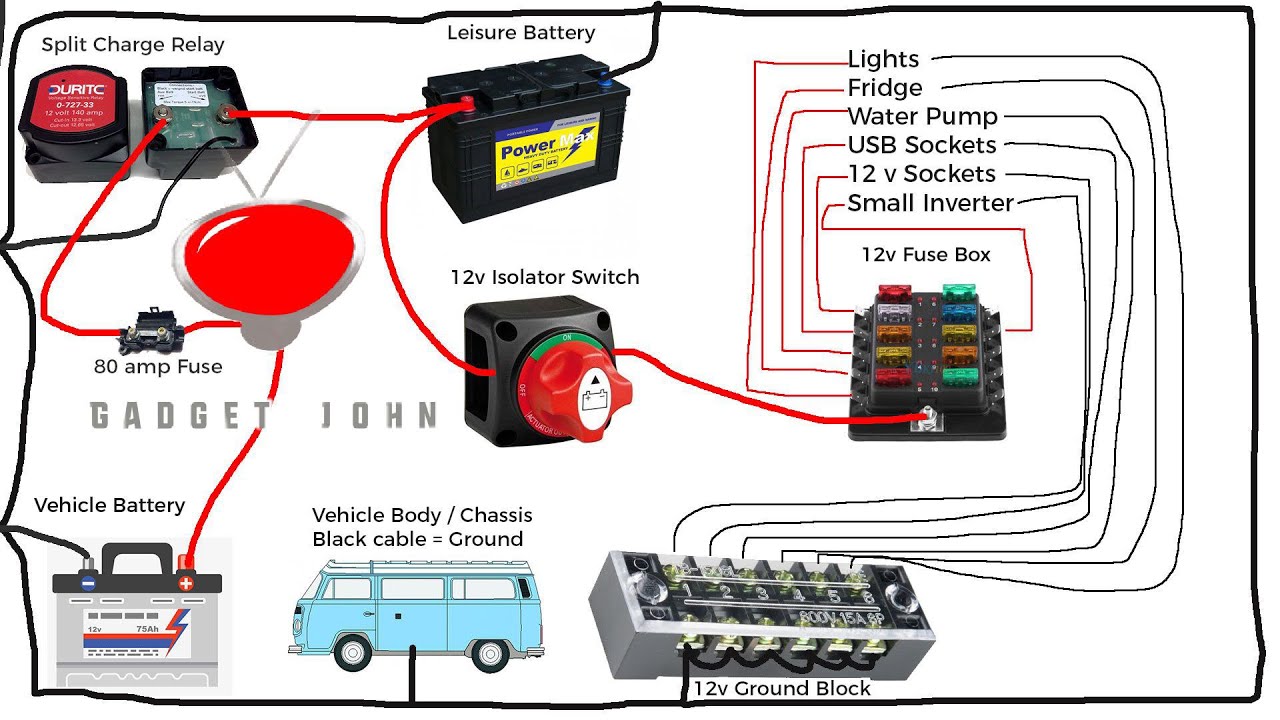
The following diagram illustrates a typical wiring configuration for a battery switch in a travel trailer. This setup uses a dual-battery system, common in larger RVs.
Imagine a rectangle representing the battery switch. On the left side, two thick wires connect to the positive terminals of your two batteries (House Battery and Chassis Battery). On the right side, a thick wire goes to the positive bus bar of your trailer’s electrical system. A smaller wire connects from the battery switch to the negative bus bar, ensuring a complete circuit.
Each battery also has a separate negative wire running directly to its respective ground point. A fuse is included in the positive wire leading to the house battery, protecting that circuit from overloads.
Installation Steps
Before you begin, disconnect the negative terminals from both your house and chassis batteries to prevent accidental short circuits. Gather the necessary tools and materials.
- Battery switch (choose a switch rated for the amperage of your battery system)
- Heavy-gauge wire (at least 4 gauge, or larger depending on your battery bank’s amperage)
- Wire connectors (crimp-on ring terminals are recommended)
- Fuse (appropriate amperage for your house battery system)
- Wire loom (to protect the wires)
- Screwdriver (Phillips and flathead)
- Wire strippers/cutters
- Crimping tool
- Voltage meter (for testing)
Once you have everything, carefully follow these steps: Mount the battery switch securely in a readily accessible, dry location. Run the heavy-gauge wires from the batteries to the switch, ensuring secure connections with the correct sized ring terminals. Connect the output wire from the switch to the positive bus bar. Connect the negative wire to the negative bus bar.
Install the fuse in the positive wire to the house battery. Protect the wires with wire loom to prevent chafing and damage. Finally, reconnect the negative battery terminals and test your system with a voltage meter to ensure everything is functioning correctly.
Wiring Configurations and Implications
Several wiring configurations exist for battery switches, each with implications for power distribution and system protection.
- Parallel Configuration: Both batteries are connected to the load simultaneously. This provides maximum power but can lead to faster discharge of both batteries.
- Series Configuration: Batteries are connected end-to-end, doubling the voltage but halving the amperage. This is less common in RV systems.
- Isolated Configuration: Allows the selection of either battery or both for power. This offers flexibility and improved control, preventing one battery from draining the other.
The choice depends on your specific needs and the size of your battery bank. The isolated configuration is generally preferred for its safety and control features.
Connecting to House and Chassis Batteries
Connecting the battery switch correctly is crucial for the safe and efficient operation of your RV’s electrical system. Remember, always disconnect the negative terminals before working with any wiring.
The house battery typically powers the interior appliances and lights. The chassis battery powers the starting system for your tow vehicle. The switch allows you to isolate the house battery from the chassis battery, protecting the chassis battery from being drained by the house system and vice versa. Ensure the positive wires from each battery are connected to the appropriate terminals on the switch and that the negative wires are connected to the appropriate ground points.
A properly wired system will allow you to selectively power your house system while leaving the chassis battery unaffected.
Maintaining Your Travel Trailer’s Battery System
Keeping your travel trailer’s battery system in top shape is crucial for reliable power on the road. Regular maintenance prevents costly repairs and ensures you’re always ready for your next adventure. Neglecting your batteries and switch can lead to frustrating breakdowns and a significant drain on your wallet in the long run.Preventative maintenance extends the lifespan of both your batteries and your battery switch, saving you money and headaches.
Regular inspection and cleaning are key to ensuring optimal performance and preventing premature failure. A little proactive care goes a long way in maintaining a reliable power source for your travels.
Battery Terminal and Connection Inspection
Regularly inspecting your battery terminals and connections is vital for preventing power loss and corrosion. Corrosion buildup creates resistance, reducing the flow of electricity and potentially damaging your batteries. Visually check for corrosion, loose connections, or any signs of damage at least once a month, and more frequently if you’re using your trailer often in humid or salty environments.
Pay close attention to the connections at the battery switch itself, as these are critical points of failure. A simple visual inspection can often identify problems before they become major issues.
Cleaning Corroded Battery Terminals and Connections
Corrosion on battery terminals is a common problem, especially in humid climates. This corrosive build-up can significantly impede the flow of electricity, leading to poor performance or even complete failure of your battery system. To clean corroded terminals, you’ll need a wire brush, baking soda, water, and a protective pair of gloves. First, disconnect the battery cables from the terminals.
Then, use the wire brush to remove as much corrosion as possible. Next, make a paste of baking soda and water and apply it to the terminals, letting it sit for a few minutes to help neutralize the acid. Scrub the terminals again with the wire brush and rinse them thoroughly with clean water. Finally, reconnect the cables, ensuring they’re securely fastened.
Remember to always disconnect the negative terminal first and reconnect it last.
Routine Battery System Maintenance Checklist
Before embarking on any maintenance, always disconnect the negative battery terminal first to prevent accidental short circuits.
- Monthly Inspection: Visually inspect battery terminals and connections for corrosion, looseness, or damage. Check the battery switch for proper operation.
- Quarterly Cleaning: Clean battery terminals and connections using a wire brush and baking soda paste as described above. Inspect the battery switch for any signs of wear or damage.
- Annual Deep Cycle Charge: Perform a deep cycle charge on your batteries using a suitable charger. This helps to equalize the cells and extend battery lifespan.
- Battery Switch Lubrication: If your battery switch has a moving component, lubricate it with a suitable lubricant to ensure smooth operation. Refer to the manufacturer’s instructions for recommended lubricant types.
- Visual Inspection of Cables: Inspect all battery cables for any signs of damage, such as fraying or cracking. Replace damaged cables immediately.
Following this checklist will help ensure your travel trailer’s battery system remains reliable and provides years of trouble-free service. Remember that the frequency of maintenance may need to be adjusted based on your usage and environmental conditions.
Impact of Battery Switch on Travel Trailer Power Management
The battery switch is the unsung hero of off-grid travel trailer power. It’s the central control point, dictating how your house batteries interact with your shore power and ultimately, how long your appliances can run without plugging into a campsite’s electrical hookup. Understanding its role is crucial for maximizing your battery life and avoiding frustrating power outages on your adventures.Proper use of your battery switch directly impacts how efficiently you use your battery power.
Different switch configurations—like using only the battery, using only shore power, or combining both—affect how much power various appliances draw, leading to varying degrees of battery drain. This directly translates to how long you can comfortably stay off-grid.
Battery Switch Configurations and Appliance Performance
The way you configure your battery switch significantly impacts the performance of your appliances. For instance, running your air conditioner solely on battery power will quickly drain your batteries, while using shore power allows it to run indefinitely. Conversely, smaller appliances like LED lights will have a much less noticeable impact on battery life, regardless of the switch position.
Careful consideration of your appliance power draw and the switch setting is key to avoiding unexpected power shortages.
Power Management and Avoiding Battery Drain
Effective power management is essential for extending the lifespan of your batteries and ensuring you have enough power for essential appliances. This involves understanding the power consumption of each appliance, strategically using higher-power appliances only when connected to shore power, and employing energy-saving techniques like turning off lights and unplugging unused devices. Prioritizing essential appliances (like your refrigerator) over less critical ones is another crucial aspect of power management.
Regularly checking your battery levels and understanding your usage patterns will help you anticipate power needs and avoid surprises.
Appliance Power Consumption and Battery Switch Impact
The following table illustrates the power consumption of common travel trailer appliances and how using the battery switch affects their operation. Note that these are estimates and actual power draw may vary based on the specific appliance and its usage.
| Appliance | Power Consumption (Watts) | Battery Switch Position (Battery Only) | Battery Switch Position (Shore Power Only) |
|---|---|---|---|
| LED Interior Lights | 5-10 | Runs for extended periods | Runs indefinitely |
| Refrigerator (12V DC) | 50-75 | Runs for several hours (depending on battery capacity) | Runs indefinitely |
| Air Conditioner | 1500-2000 | Drains batteries rapidly | Runs indefinitely |
| Microwave Oven | 1000-1500 | Drains batteries quickly | Runs normally |
Battery Switch and Different Battery Types
Choosing the right battery switch for your travel trailer is crucial, and this choice is heavily influenced by the type of batteries you’re using. Different battery chemistries have varying voltage requirements, charging characteristics, and sensitivities, all of which impact compatibility with various battery switch designs. Understanding these differences ensures a safe and efficient power system.Different battery switch designs are optimized for specific battery types and voltages.
A switch designed for lead-acid batteries might not be suitable for lithium batteries, and vice-versa, potentially leading to malfunctions or even damage. This section details the compatibility of various battery types with different battery switch designs, highlighting crucial considerations for lithium batteries and potential issues arising from mismatches.
Lead-Acid Battery Compatibility with Battery Switches
Most standard battery switches are designed for lead-acid batteries (flooded, gel, or AGM). These switches typically handle 12-volt systems and are relatively straightforward to install and use. They are usually robust and can handle the higher surge currents associated with starting a vehicle. However, lead-acid batteries have a lower energy density and shorter lifespan compared to lithium batteries.
They also require more maintenance and are susceptible to sulfation if not properly charged and maintained. The majority of RV battery switches readily accommodate these types of batteries.
Lithium Battery Compatibility with Battery Switches
Lithium batteries, while offering higher energy density, faster charging times, and longer lifespan, require specific considerations when used with a battery switch. Standard lead-acid battery switches may not be suitable because lithium batteries have a different voltage profile and are more sensitive to overcharging and discharging. Some lithium battery systems use a Battery Management System (BMS) which regulates charging and discharging.
Using an incompatible switch can bypass the BMS, leading to potential damage to the battery. Dedicated lithium battery switches, or switches specifically rated for lithium, often include features to accommodate the BMS and prevent overcharging or under-voltage situations.
Issues Arising from Incompatible Battery Switch and Battery Type Combinations
Using an incompatible battery switch can result in several problems. For example, using a standard switch with lithium batteries could lead to:
- Overcharging: Damaging the lithium battery cells and potentially causing a fire.
- Under-voltage: Preventing the battery from fully charging, reducing its lifespan and performance.
- BMS bypass: Disabling the crucial safety features of the BMS, leaving the battery vulnerable to damage.
- Switch failure: The switch itself might overheat or fail due to the different electrical characteristics of the lithium battery.
Conversely, using a lithium battery switch with lead-acid batteries might not cause immediate damage but could lead to inefficiencies in charging and potentially reduce the lifespan of the lead-acid battery. The switch may not be optimized for the characteristics of the lead-acid battery, leading to suboptimal performance.
Recommendations for Selecting the Appropriate Battery Switch
When selecting a battery switch, always prioritize compatibility with your battery type. If using lithium batteries, specifically choose a switch designed for lithium, ensuring it’s compatible with your specific battery model and BMS. The switch’s amperage rating should also be sufficient for your system’s demands. Always consult the manufacturer’s specifications for both the battery and the battery switch to ensure compatibility.
If unsure, seeking advice from an RV specialist or qualified electrician is recommended.
Safety Considerations with Battery Switches: Battery Switch On Travel Trailer Function
Working with your travel trailer’s electrical system, especially the battery and its switch, requires careful attention to safety. Incorrect handling can lead to serious injury or damage to your RV. Understanding the potential hazards and taking appropriate precautions is crucial for a safe and successful experience.Improper use or installation of a battery switch can result in a variety of dangerous situations.
These range from minor inconveniences like blown fuses to severe hazards such as electric shock, burns, explosions, and fire. Even seemingly small mistakes can have significant consequences.
Risks of Working with RV Electrical Systems and Necessary Safety Precautions
Working with any electrical system, especially those involving high-amperage components like RV batteries, presents inherent risks. These risks are amplified in the often-confined spaces of a travel trailer. To mitigate these risks, several precautions must be followed diligently. Failing to do so can lead to severe injury or even death.
Safety Equipment for Working with Batteries and Electrical Systems
Before beginning any work on your travel trailer’s electrical system, it’s essential to gather the necessary safety equipment. This equipment will help protect you from potential hazards and ensure your safety.
- Safety glasses: Protect your eyes from sparks, acid splashes, and other debris.
- Rubber gloves: Insulate your hands from electrical shock and protect them from battery acid.
- Insulated tools: Use tools with insulated handles to prevent electrical shock.
- Battery terminal cleaner: A clean connection is a safe connection. This prevents arcing and potential fires.
- Baking soda and water: Neutralize any battery acid spills immediately.
- Fire extinguisher: Have a Class B or ABC fire extinguisher readily available.
Potential Consequences of Ignoring Safety Procedures
Ignoring safety procedures when working with RV electrical systems can lead to a range of severe consequences. For example, failing to disconnect the battery before working on the system could result in a potentially fatal electric shock. Improper handling of battery acid can cause chemical burns to the skin and eyes, requiring immediate medical attention. A spark near a battery could ignite flammable gases, leading to an explosion and fire, potentially destroying your RV and causing significant injury or death.
Furthermore, incorrect wiring could lead to overheating, potentially melting wires and causing a fire. Even seemingly minor mistakes can compound and lead to major issues. A loose connection could cause arcing and a fire. Neglecting to use insulated tools can lead to a shock that can result in anything from a minor jolt to cardiac arrest.
Always prioritize safety to prevent these serious consequences.
Mastering your travel trailer’s battery switch is a vital skill for any RV owner. By understanding its function, troubleshooting common issues, and practicing safe operation, you can ensure reliable power and extend the lifespan of your batteries. Remember regular maintenance and proper wiring are crucial for a worry-free RV experience. So, power up your knowledge and hit the road with confidence!
FAQ Explained
What happens if I accidentally leave my battery switch in the wrong position?
Depending on the position, you could drain your house battery, your vehicle battery, or both. Always double-check the position before leaving your RV unattended.
How often should I inspect my battery connections?
At least every three months, or more frequently if you notice any unusual performance issues.
Can I use any type of battery with my battery switch?
No, some battery switches are designed for specific battery types (like lead-acid vs. lithium). Using an incompatible switch can damage your batteries or create safety hazards. Check your switch’s specifications and your battery type before connecting.
What should I do if my battery switch is completely unresponsive?
Check the fuses first. If the fuses are blown, replace them with the correct amperage. If the problem persists, you may need professional help.
